Authenticating With an OpenID Provider
This is an experimental feature. That means we’re still working on finishing it. There may be bugs, missing functionality or incomplete documentation, and we may decide to remove the feature in a future release. If you have any feedback, please open an issue or post a message in the Discord.
Client Version 25.1.0 and Server Version 25.1.0 or higher are required for this feature.
Setup
This feature requires use of Actual Server
If you require a more robust authentication method than a server password, it is recommended to use an OpenID provider. Most OpenID providers support multi-factor authentication, enhancing your application's security. Additionally, if you need support for multiple users, you must enable this feature.
To enable this feature, you can use a configuration file config.json on the Actual server, or use the UI.
Configuration Using a Configuration File
If your OpenID provider supports discovery, use the following configuration example:
"openId": {
        "discoveryURL": "URL for the OpenID Provider",
        "client_id": "client_id given by the provider",
        "client_secret": "client_secret given by the provider",
        "server_hostname": "your Actual Server URL (so the provider redirects you to this)",
        "authMethod": "openid" // or "oauth2"
    }
If your OpenID provider does not supports discovery, you have to configure each endpoint manually:
"openId": {
        "issuer": {
            "name": "Friendly name for the issuer",
            "authorization_endpoint": "Provider's authorize endpoint",
            "token_endpoint": "Provider's access token endpoint",
            "userinfo_endpoint": "Provider's user info endpoint"
        },
        "client_id": "client_id given by the provider",
        "client_secret": "client_secret given by the provider",
        "server_hostname": "your Actual Server URL (so the provider redirects you to this)",
        "authMethod": "openid" // or "oauth2"
    }
To use GitHub as an identity provider can only be achieved with configuration files using "authMethod": "oauth2".
Configuration Using Environment Variables
If your OpenID provider supports discovery, use the following variables:
ACTUAL_OPENID_DISCOVERY_URL: URL for the OpenID ProviderACTUAL_OPENID_CLIENT_ID: client_id given by the providerACTUAL_OPENID_CLIENT_SECRET: client_secret given by the providerACTUAL_OPENID_SERVER_HOSTNAME: Your Actual Server URL (so the provider redirects you to this)
If your OpenId provider does not supports discovery, use the following variables:
ACTUAL_OPENID_AUTHORIZATION_ENDPOINT: Provider's authorize endpointACTUAL_OPENID_TOKEN_ENDPOINT: Provider's access token endpointACTUAL_OPENID_USERINFO_ENDPOINT: Provider's user info endpointACTUAL_OPENID_CLIENT_ID: client_id given by the providerACTUAL_OPENID_CLIENT_SECRET: client_secret given by the providerACTUAL_OPENID_SERVER_HOSTNAME: Your Actual Server URL (so the provider redirects you to this)
Configuring OpenID Using the UI
Navigate into any Budget file, then in the Settings, click on Start using OpenID
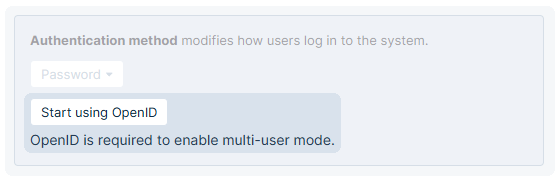
Once you click Start using OpenID a modal will be presented.
Instructions
Fill all the required field for the selected provider.

Some providers does not require all fields to be filled out.
As an example, the provider passwordless.id does not need client_secret.
When all settings are correctly filled out, click the 'OK' button, and you will be redirected to the login page.
There are some basic configuration checks when clicking 'OK', but if you somehow type the wrong information and the data is saved, when you login for the first time using OpenID, you will have a chance to review the settings.
When configuring your OpenID provider, be sure to register the following redirect URI with the provider: https://<your-domain.tld>/path/openid/callback
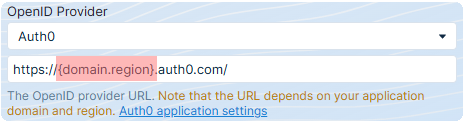
Tested Providers
- Auth0
- Authentik
- GitHub
- Google Accounts
- Keycloak
- Microsoft Entra
- Passwordless.id
- Pocket ID
Each provider has different requirements. For example, for Auth0, the URL will be generated by default, but you have to change it with your own details:
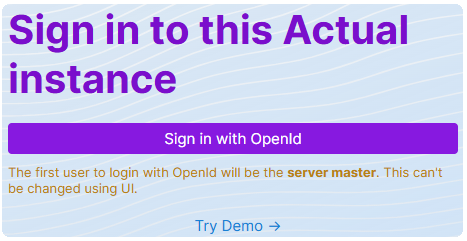
After Setup:
When setup is done, you will be redirected to the login page:
Environment Variables
ACTUAL_OPENID_DISCOVERY_URL
- Purpose: If your OpenID provider supports discovery, this is the URL where discovery metadata can be found.
Example Value:https://provider.tld/.well-known/openid-configuration
ACTUAL_OPENID_CLIENT_ID
- Purpose: The client ID issued by your OpenID provider.
Example Value:my-actual-app
ACTUAL_OPENID_CLIENT_SECRET
- Purpose: The client secret issued by your OpenID provider.
Example Value:super-secret-value
ACTUAL_OPENID_SERVER_HOSTNAME
- Purpose: The public URL of your Actual Server, which the provider redirects to after authentication.
Example Value:https://actual.myserver.com
ACTUAL_OPENID_AUTHORIZATION_ENDPOINT
- Purpose: Provider’s authorization endpoint (for providers that don’t support discovery).
Example Value:https://provider.com/oauth2/authorize
ACTUAL_OPENID_TOKEN_ENDPOINT
- Purpose: Provider’s token endpoint (for providers that don’t support discovery).
Example Value:https://provider.com/oauth2/token
ACTUAL_OPENID_USERINFO_ENDPOINT
- Purpose: Provider’s user-info endpoint (for providers that don’t support discovery).
Example Value:https://provider.com/oauth2/userinfo
ACTUAL_OPENID_AUTH_METHOD
- Purpose: Tells the server whether it should use the OpenID (OIDC) or a more general OAuth2 flow.
Possible Values:openid(default)oauth2
Tip: Use oauth2 for providers like GitHub that don’t fully support OpenID discovery.
ACTUAL_OPENID_ENFORCE
- Purpose: Forces OpenID/OAuth2 authentication as the only allowed login method when set to
true.
Example Value:trueorfalse(default isfalse)
ACTUAL_TOKEN_EXPIRATION
- Purpose: Controls how access tokens expire.
Possible Values:"never"(tokens never expire - current default)"openid-provider"(tokens follow the expiration time from the OpenID provider)- A numeric value in seconds (e.g.,
3600for 1 hour)
Configuring the OpenID provider from options supports discovery; otherwise, use file configuration