Writing Documentation
Except for a few sections, most of the documentation is aimed at end users. It is important to keep this in mind when writing documentation. In practice, this means that it is better to be a bit verbose and write out every step in a process than to assume that the reader is on the writer's technical level.
Read example
For those with experience, the process is straightforward and familiar: To update with our latest releases, simply use the git pull command from the master branch of your local directory of Actual. Once the changes are updated, execute the yarn install to download the latest updates from the releases.
A better approach for inexperienced people, as it explains what each step is doing and the expected outcome:
- Stop the server if it's running. You can use the keyboard shortcut (even on macOS) to stop the server or close the terminal window it's running from.CtrlC
- Run
git pullfrom the directory you cloned the project into. This will download the latest server code. - Run
yarn installfrom that same directory. This will download the latest web client code and any updated dependencies for the server. - Restart the server by running
yarn start:docs
We generate our website using the Docusaurus system, and our documentation is written in Markdown (+ some Docusaurus specifics).
If you're interested in contributing, you'll need to know about the following two resources:
Documentation Structure
Document Front Matter
Front matter is used to add metadata to the documentation file. The front matter enriches the default metadata inferred from the content or other configuration.
Using front matter is not mandatory.
---
title: My Doc Title
more_data:
  - Can be provided
  - as: objects
    or: arrays
---
Document Headings and Subheadings
We follow a strict, mandatory, structure in our documents by using Markdown headings.
If the title tag is not provided in the front matter, you must start the document with a level 1 heading. If the title tag is provided, you must omit this level 1 heading. Each document should have only one level 1 heading.
# Level 1 Markdown Heading is used instead as The Document Title if Front Matter title tag is not used
Many documents are divided into multiple main sections for improved readability and organization, with level 2 headings serving as the method for structuring the content.
Use level 3 headings when a main section becomes complex and requires further breakdown.
Additionally, if necessary, a fourth level of headings is available to provide even more detailed categorization.
It is important to note that both level 1 and level 2 headings are prominently displayed in the right sidebar, making it easier for readers to navigate the document and locate specific sections efficiently.
## Level 2 Markdown Heading: Main Section Headings are used to split the document into main sections

### Level 3 Markdown Heading: Subsections Headings are used to split each section

#### Level 4 Markdown Heading: Use this if you need to split the Subsection further
Documentation Folder Structure
The documentation folder structure should follow the structure in the left of the screen. This means sections with more than one page have their own directories.
Click here to get an overview of the folder structure
website # the root directory of the documentation site
├── docs
│   └── index.md # the introduction file.
│   └── faq.md
│   └── releases.md # release notes.
    └── accounts # Anything relating to accounts, account management or transactions.
        ...
    └── advanced # Some more advanced guides for Actual.
        └── scripts
        ...
    └── backup-restore
        ...
    └── budgeting # Budget specific, including rules, schedules etc.
        └── rules
        ...
    └── contributing # How to contribute, project structures etc.
        ...
    └── experimental # Documentation for experimental features.
        ...
    └── getting-started # Getting started with Actual.
        ....
    └── install # Documentation around installing actual.
        ...
    └── migration # Migrating into Actual and using the tools available.
        ...
    └── reports # Everything reporting.
        ...
    └── tour # The Actual Tour.
        ...
    └── transactions # Handling transactions.
        ...
    └── troubleshooting # Hints and tips regarding troubles.
        ...
│
└── static
    └── img
Document Guidelines
Below are some basic guidelines on how the documentation should be formatted. Everyone has their own writing style, but we aim to keep the style of the documentation the same across the site.
Language
When writing documentation, please use the English language. At this time, the documentation team doesn't have any translators available to translate documents into other languages, but this is something we would like to do in the future.
Docusaurus 3 provides translation using i18n. If this is something you would like to pursue, please feel free to open a PR.
Tone and Voice
-
Friendly and Approachable: Write in a conversational and welcoming tone. The goal is to make users feel comfortable and supported.
-
Active Voice: Use active voice to make sentences more direct and engaging. Example: Install Actual Budget on your computer instead of Actual Budget should be installed on your computer.
-
Time Neutral: Use present voice, unless documentation is for experimental or unreleased features. Where time references are made, remove them upon release or removal of the feature. Example: Filters can be used... instead of As of June 2022 update, you can....
A Short Style Guide
- Prefix monetary values with the $ (dollar) sign.
- Use the , (comma) sign as the thousands' separator.
- Calculations should never have the dollar prefix, nor the thousand separator signs.
- All headings must use Title Case using the Chicago Manual of Style rule set.
Format
-
Keep paragraphs short and focused. Each paragraph should convey a single idea or concept.
-
Use bullet points or numbered lists to break down information into digestible chunks.
-
Consistent Terminology: Use consistent terminology throughout the documentation. Refer to the product as "Actual Budget" or "Actual."
Formatting Text
All documentation is written in Markdown, with certain additional Markdown syntax provided by Docusaurus.
If you have never used Markdown, please consult CommonMark and the Docusaurus Markdown Features guide. You can learn more about Markdown in The Markdown Guide.
Linking Between Pages
When linking from one documentation page to another, use a relative file path that includes the .md extension, not the page's URL:
Read our [Starting Fresh](../getting-started/starting-fresh.md) guide.
instead of
Read our [Starting Fresh](/docs/getting-started/starting-fresh) guide.
Docusaurus resolves file paths at build time and converts them to the published URLs, so links that point at a missing file or heading fail the build (onBrokenLinks and onBrokenAnchors are both set to throw) instead of silently breaking for readers. When linking to a specific section, place the anchor after the extension: ../api/reference.md#importtransactions.
Blog posts and the standalone pages in src/pages/ live outside the docs/ folder and can't reference documentation by file path. Use relative URLs from those files instead, for example ../../docs/install/ from a blog post.
Keyboard Shortcuts
<Key k="f" /> shows the f-key.
<Key k="enter" /> shows the Enter-key.
<Key mod="shift" k="enter" /> shows the Shift-Enter key combination.
<Key mod="cmd" k="enter" /> shows the Command-Enter key combination.
The above will be rendered as follows
- shows the f-key.F
- shows the Enter-key.Enter
- shows the Shift-Enter key combination.ShiftEnter
- shows the Command-Enter key combination.CmdEnter
Highlights
If you would like to highlight a section of the document you can use the following:
:::tip
Your tip content
:::
:::note
Your note content
:::
If you want to make a reader aware of a cautionary item in the documentation, you can use this:
:::caution
Your cautionary item
:::
If you want to make a reader aware of something really important that can mess up their budget, use this:
:::warning
Your warning content
:::
The above highlights will be rendered as follows
Your tip content
Your note content
Your cautionary item
Your warning content
Hiding and showing information
This is a summary box, click here to see how it's made
<details>
<summary>The title of the summary</summary>

Place the content inside the details-tags.

</details>
How To Fix Spelling Errors
As part of the build process, GitHub Actions runs a spell checker (typos) on the documentation. If it finds any spelling error, it will be reported in the build output on GitHub. You must fix this by editing the file and correcting the spelling error.
If the checker mistakes a word, you can allow it by adding it to the [default.extend-words] section of /.github/actions/docs-spelling/typos.toml, mapped to itself (for example HSA = "HSA").
This will prevent it from being reported as a spelling error in the future.
Naming Standards
For Documents
- Filenames should be self-explanatory and reflect the title of the file.
- A longer, more descriptive filename is preferred over a shorter, less descriptive one.
- Folder names must reflect the naming in the sidebar.
For Images
- Images must be placed in the
/static/img/folder. - Except for logos and such, all images related to the documentation must be placed in a folder corresponding to the location of the document in which it is used. Let's say you want to add an image to a document in the
/docs/budgeting/folder - the corresponding images must be stored in the/static/img/budgeting/folder. - Image names must be prefixed to correspond with the document they primarily belong to. Let's say you are adding an image to the
/docs/budgeting/categories.mdfile, then all image names need to be prefixed withcategories-. - For regularly used images, these can be put into
/static/img/elements/, inside it's own folders. Let's say you want to store images related to the sidebar; then all sidebar images need to be placed in/static/images/elements/sidebar/. We have decided to do it this way to minimize the workload when adding and updating images.
Using Images
Using images to accompany the description makes the documentation more accessible, thus improving its readability.
The way to do this is to take good screenshots. When taking screenshots, there are a few things to keep in mind:
- It is crucial to ensure that the image is crystal clear and directly relevant. Blurry or muddled images can detract from the user's understanding and confidence in the documentation.
- Striking the right balance on how much a screenshot should include is vital. Too much information can overwhelm the reader, while too little can leave them without the necessary context. Your judgment in this matter is crucial to the effectiveness of the documentation.
- Avoid taking screenshots on a big screen when the browser is in full-screen mode. Try to take screenshots at most 1100 pixels wide and 700 pixels long. By this, we do not mean the size of the finished images but how much of the screen you are taking a picture of.
- Images must always be saved in the PNG format.
- Take images using only the light mode, not dark.
- If you need to address more than one part of the screenshot, annotate the image. See below for more details.
- We strongly encourage you to always add alt text to the images, as not all image names are self-explanatory.
Screenshots taken on a retina screen should be titled as such: image-name2x.png. This allows Docusaurus to rescale the images where appropriate.
Annotating Images
There are several reasons why you need to annotate screenshots. One reason is that you want readers to pay attention to some aspects of the GUI. This is true if you have a screenshot of an area (for context) and you need to highlight one part of that area. Another reason is that you must address more than one element in the GUI, but presenting several variants of the same screenshot is unfavorable. We have a few suggestions when annotating screenshots:
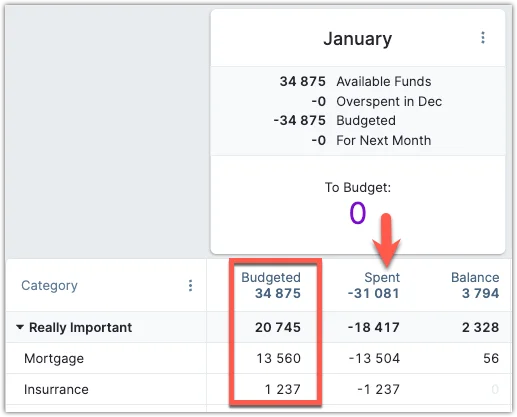
Do Use Boxes Over Arrows
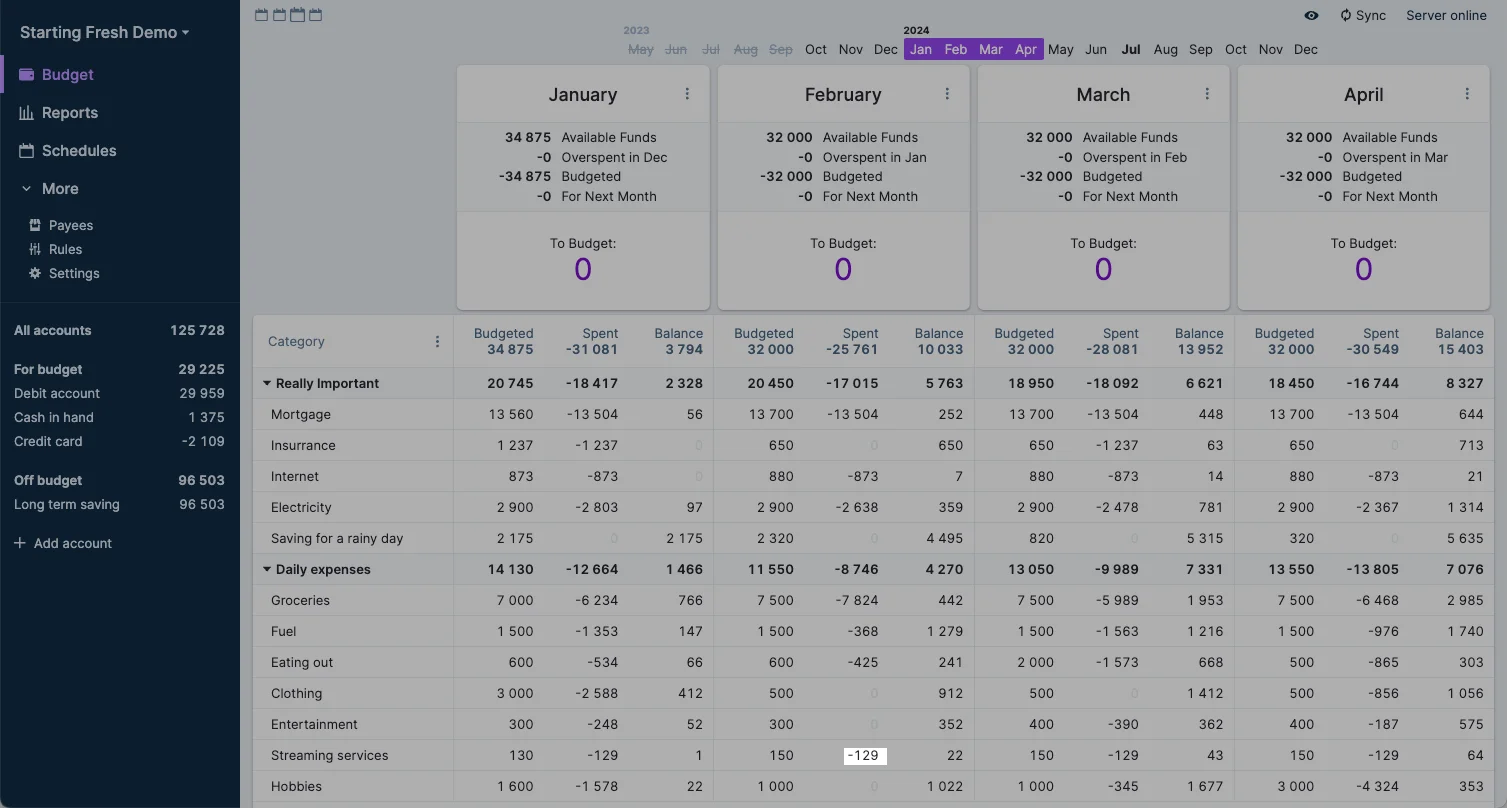
Arrows can inadvertently be misunderstood as pointing from something rather than to. As we see in the example below, the reader can not be sure if the arrow means the column, the column header or if To Budget is involved.
Use "Steps" When Referring to Several Elements
Use running numbers or letters inside circles, also known as "steps", when addressing more than one element in the screenshot. If there is a sequence to what a user is going to click on, use step numbers; if you want to address various elements, letters are preferred.
If the annotation tool doesn't support 'steps ', use boxes in different colors and incorporate these colors into the explanation. This will help guide the reader's attention effectively.
Read example description of this way of annotating
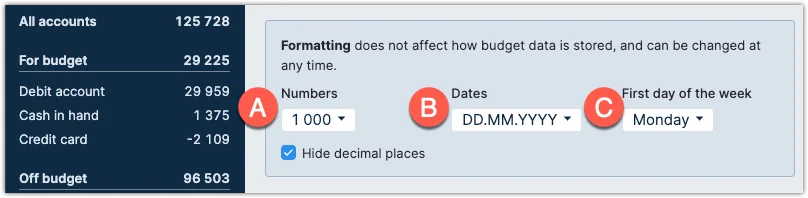
Using steps
a. Formatting numbers. We support most commonly used formats.
b. Choose the date format that you are most comfortable with.
c. The first day of the week controls grouping on reports.
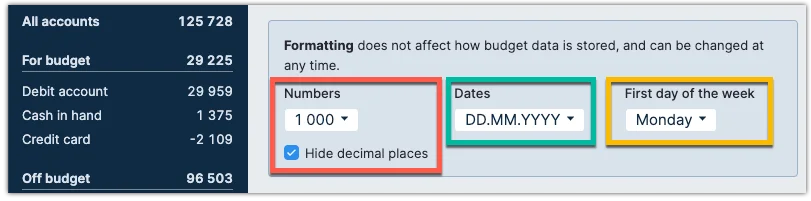
Using colored boxes:
- Formatting numbers (indicated by the red box). We support most formats that are commonly used.
- If you want to change the date format you are most comfortable with, you can use the dropdown in the green box.
- The first day of the week controls grouping on reports. You will find this control indicated in the yellow box.
Do not Draw Annotations Using "Free Hand"
Do not use free hand "marker pens", boxes or arrows, as these kind of annotations just look sloppy. Ask for help on the Actual Budget #documentation Discord channel if you need to annotate images but are not able to do it yourself.
Annotation Colors
Use strong, clear, and crisp colors to create good contrasts. Do not use pure white or pure black. Even if we want all screenshots taken using the light theme, there are dark elements like the sidebar and particular dropdowns in the GUI. Avoid annotating these elements using dark colors.
Remember that colors are tricky for color blind people.
We suggest using the following colors (RGB values):
| Color name | Decimal | Hex |
|---|---|---|
| Red | 255, 89, 75 | FF 59 4B |
| Yellow | 251, 186, 0 | FB BA 00 |
| Purple | 119, 64, 154 | 77 40 9A |
| Blue | 112, 175, 253 | 70 AF FD |
| Green | 0, 187, 161 | 00 BB A1 |

For accessibility reasons (color blindness), avoid using red and green annotation colors on the same image.
Avoid Using Transparency or Spotlight Annotations
Different annotation tools handle this in various ways, which means we will get inconsistent screenshots. Secondly, unless you can control the opacity and color of the highlight, using highlighting could easily confuse more than enlighten the reader. Can you quickly find the highlighted number in the screenshot below?

It might work when using the light theme
However, because we dim down the rest of the image, this breaks over the notion that images should be clear and crisp.
Software For Taking and Annotating Screenshots
There are many software packages available to help you take screenshots. Both Windows and Mac systems come with some rudimentary tools for this (like Windows Snipping Tool or in macOS). For various Linuxes, this Fosspost.com article can be consulted.
Some of the mentioned tools will let you annotate screenshots, others will not.
If you are serious about your screenshots (and also helping out with the Actual documentation), you might want to consider tools created explicitly for taking screenshots and having good annotation support. This list is not an endorsement from the Actual Budget project team but is meant as a starting point for such tools.
For Windows and Mac:
- Greenshot is a simple and effective open-source solution.
- Flameshot is a complete open-source package for taking and annotating screenshots. This program is more complex than Greenshot.
- Many consider SnagIt the best tool in this category, but it comes at a cost.
For Linux, please see this Fosspost.com article.